
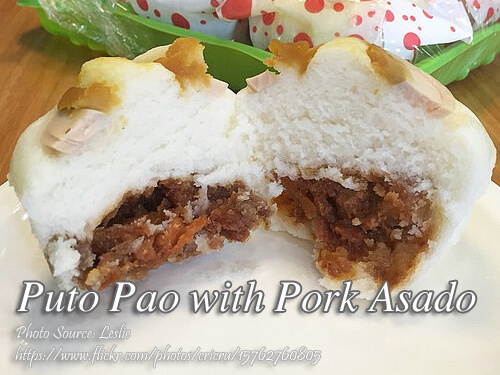
Puto pao is one of the many creative variants of the ordinary puto, and usually the white puto. Actually you can do the same with the ordinary puto batter by just putting a filling inside. The puto recipe I have here is a little special because it contains milk and butter and what makes it more special is the pork asado filling inside. You can use asado filling for siopao asado which you can also find in this site.
A Nostalgic Filipino Treat: Making Puto with Pork Asado Filling
One of my earliest memories of family gatherings in the province was the smell of puto pao steaming away in my Lola Nena’s kitchen. I remember her preparing the batter, talking us through each step as if she was sharing a family secret. While puto, or steamed rice cakes, is a common delicacy in the Philippines, it takes this humble treat to another level with a savory surprise—a pork asado filling tucked inside, much like a small siopao. This little twist brings back so many memories and a taste of home with each bite. Let’s dive into how to make this delightful Filipino treat with a bit of storytelling and technique to guide you through!
A Twist on Classic Puto: What Makes It Special
Puto, often enjoyed as a snack or paired with savory dishes like dinuguan, is traditionally a simple, fluffy rice cake. But when someone in the family first tried putting asado inside the puto, it turned into a wonderful combination of flavors. This recipe is special because it includes butter and milk, making the batter extra tender and flavorful, and it’s topped with a classic pork asado filling, much like what you’d find inside siopao buns. The richness of the pork and the subtle sweetness of the puto work together to make each bite a little piece of Filipino comfort.
Gathering Your Ingredients for an Authentic Puto Pao
For the perfect puto pao, start with ingredients that will give it that traditional taste and texture. The batter requires flour, baking powder, sugar, milk, butter, and water to create a smooth, light mixture. Using milk and melted butter, instead of just water, is a little secret that makes the puto richer and more tender. My Tita Lita always insisted on using full-fat milk for this; she believed it gave a creamier flavor and improved the texture of the puto. These additions may seem simple, but they make a big difference in the final taste.
For the filling, we’re making pork asado, a well-loved Filipino dish typically served in siopao. This version uses soy sauce, oyster sauce, and a touch of sugar to create a balance of savory and sweet that perfectly complements the slightly sweet puto batter.
How to Make Puto Pao: Tips from the Family
Each step in making it involves simple techniques that can easily be mastered, even by beginners. In a large mixing bowl, combine your dry ingredients—flour, baking powder, and sugar. Mixing the dry ingredients first ensures the baking powder is evenly distributed, so the puto will rise uniformly when steamed.
Add melted butter, milk, and water into the mixture. Stir gently to prevent too much air from forming bubbles in the batter. My cousin Jose once told me this was the secret to a smooth, tender puto pao. Overmixing can make the puto tough, so just blend it enough to smooth out any lumps.
When it’s time to assemble, grease the molds with butter or margarine to ensure the puto doesn’t stick. Fill the molds halfway with batter, then add a spoonful of pork asado filling. Cover the filling with more batter until it just covers the top. Topping with salted egg and cheese gives a salty contrast, adding to the nostalgic taste of this dish.
Perfecting the Pork Asado Filling: A Rich Flavorful Center
To make the pork asado filling, start by sautéing garlic and onions until they’re soft and aromatic. This is essential for bringing out the sweetness of the onions, which will complement the soy sauce and oyster sauce in the next steps. After adding the pork, stir it until it’s fully coated with the sauce, and let it simmer with a mix of soy sauce, oyster sauce, and brown sugar.
Allowing the pork to simmer for about 30 minutes makes it tender and fully infused with the rich asado flavor. The addition of a cornstarch slurry at the end thickens the sauce, creating a filling that stays in place when steamed inside the puto. My Uncle Boyet always said the filling shouldn’t be too dry or too runny—it should be just thick enough to hold together without making the puto soggy.
Steaming Puto Pao to Perfection: Family Tricks for the Best Results
Steaming is where the magic happens, turning the batter into soft, fluffy cakes around the asado filling. Arrange the filled molds in the steamer, leaving a little space between each to allow steam to circulate evenly. Depending on the size of your molds, steaming for 10 to 15 minutes should be enough. To check if it is done, insert a toothpick into the center; if it comes out clean, they’re ready.
Let the puto cool slightly before removing them from the molds. This not only prevents burns but also helps them firm up a bit, so they won’t fall apart. The smell alone is worth the wait—a mix of sweet, savory, and that nostalgic aroma that always reminds me of family gatherings.
The Heart and History of Puto Pao in Filipino Culture
Like many Filipino dishes, is a testament to our love for combining flavors and adapting recipes. Influenced by Chinese siopao, this dish became its own creation in Filipino households. Each family has their unique twist, whether it’s using different fillings or adding cheese or salted egg on top. The variations make this treat feel like home, connecting generations through the shared experience of food.
With each bite of this homemade puto pao, you’re not only enjoying a delicious snack but also a little piece of Filipino history and creativity. Whether you’re preparing it for a family gathering, a holiday celebration, or just a weekend treat, this recipe brings the flavors of tradition and family together in one bite.
Enjoy every moment of making and sharing this special treat with loved ones, just as we have for generations.
How To Cook Puto Pao with Pork Asado Filling
Ingredients
Pork Asado filling Ingredients:
- 250 grams pork shoulder kasim, cut into small cubes
- 3 cloves garlic minced
- 1 small onion chopped
- 1 Tbsp. cornstarch diluted in 1/8 cup water
- 1/8 cup soy sauce
- 1/8 cup brown sugar
- 1 Tbsp. oyster sauce
- 1/4 tsp. black pepper powder
- 2 Tbsp. cooking oil
- 1 cup water
Puto pao batter ingredients:
- 2 cups all-purpose flour
- 1/4 cup white sugar
- 2 Tbsp. baking powder
- 1+1/4 cups water
- 1/2 cup evaporated milk
- 1/8 cup butter
For garnishing:
- sliced salted egg
- cheese sticks
Instructions
How To Cook Puto Pao with Pork Asado Filling
- In a large mixing bowl, combine all the dry ingredients: flour, baking powder, sugar and mix well.
- Then pour the melted butter, milk and water. Mix but do not make it bubble. Then stir until all the lumps disappear and the batter is smooth in consistency.
- Grease the puto molds with margarine or butter.
- Then pour some puto batter in the mould, just half of the height of the mold.
- Scoop 1 tablespoon of pork asado filling then pour again some batter until the puto mold is filled just enough to cover the filling.
- You can top your puto with thin slice of salted egg and cheese sticks if you want.
- Arrange in a steamer and steam for about 10 to 15 minutes. The time needed depends on the size of your puto.
- You can also insert a toothpick in the middle while steaming the puto to check if it is already cooked.
- If the toothpick comes out clean, then your puto is already done.
- Remove from the steamer and let it cool for a while then remove from the molds.
- Arrange in a platter then serve. Eat and enjoy!
How to Cook Pork Asado filling:
- Heat cooking in a skillet and saute garlic and onions until onions are soft. Then add in the pork and saute for 3 minutes.
- Pour soy sauce, oyster sauce, brown sugar, black pepper then stir until the pork is well coated with the sauce.
- Pour water and bring to a boil. Cover and simmer for 30 minutes or until the pork is tender.
- Pour the cornstarch slurry and stir until the sauce is thickened. Add more water if the filling is too dry. Turn off heat and set aside.
Video
Notes
Cooking Tips for Perfect Puto Pao:
- Ensure the batter is smooth: Stir the batter gently until all the lumps disappear. A smooth batter will result in softer and more appealing puto.
- Grease the molds thoroughly: To avoid any sticking, generously grease the puto molds with margarine or butter. This will make it easier to remove the puto once they're cooked.
- Be mindful of steaming time: Keep an eye on your puto pao while they're steaming. Cooking time can vary based on mold size, so it's important to check for doneness using a toothpick.
- Get creative with toppings: While the traditional puto pao doesn't require toppings, feel free to experiment and add your own personal touch. Thin slices of salted egg and cheese sticks can elevate the flavor profile of your puto.
- Serve fresh and warm: Puto pao is best enjoyed when fresh and warm. Serve them immediately after steaming for the ultimate fluffy and flavorful experience.
Nutrition Notes:
Calorie and other nutrition information is derived from HappyFolks.Com recipe nutrition calculator. The percent daily value (%DV) is based on a daily 2,000 calorie diet.Nutrition Information:
Amount per Serving:80g, Calories:167kcal, From fat:62, Total fat:7g, Saturated Fat:3g, Trans Fat:0.1g, Cholesterol: 25mg, Sodium: 204g, Total Carbohydrate: 19g, Dietary Fiber: 1g, Sugars: 3g, Protein: 6g, Vitamin A: 2%, Vitamin C: 1%, Calcium: 5%, Iron: 5%


Hi does the puto recepi use regular egg in the batter?
Hi Riza, there is no egg in the batter. Salted eggs is for garnishing.
I’m in UAE and I can’t find any puto molder. I have tin cupcake molders. will that be fine to use?
HI Sheila, yes that will be ok to use. As long as it will fit in the steamer.
Delicious!!! Keep it up!
Hi Maribel, thanks for the kind words! I’m very happy that you enjoyed the puto pao! Cheers!
Very interesting and step by step procedures .Delicious!
Hi Maribel, thanks!
egg not egg white? please answer
Hi Agnes, yes you need to use the whole egg.
So exciting all the recipes here.. If you hve iterested to have this maybe we can choose one recipe From 100 menu.
Thanks for sharing this puto pao recipe!
Hi Mirasol, You’re welcome!
I want the recipe toasted siopao because I want to try it. I want to cook it for me and for my small business. Thank you.
Hi Tolits, I have a toasted siopao recipe. Just search it in this site. You can also search it in Google you can find my toasted siopao recipe.
i want that the simple ingredients only, i’m always trying to cook for my child and for my family.thanks panlasang pinoy for the recipes.