
Chicken pastel or a pastel de pollo is a Filipino version of chicken pot pie. The only difference is that the dish don’t have the bottom pie crust. Only the top portion is layered with a flat dough that will serve as it’s crust when baked. There is also a more Filipino version that is not baked but cooked like an ordinary chicken stew without the crust.
Chicken Pastel: A Comforting Classic Straight from the Oven
There’s something comforting about pulling a freshly baked chicken pastel out of the oven. The smell alone takes me back to family gatherings where dishes were always a little richer, a little more special. Unlike everyday ulam, this Filipino-style pot pie feels like something you serve when you want to impress without making things too complicated.
The first time I made this dish, I expected it to be fussy because of the crust. But it turned out to be surprisingly forgiving. Once you understand how the filling comes together, the rest feels like assembling a warm, hearty casserole.
What Makes Chicken Pastel Unique
At its core, this is the Filipino take on a classic pot pie, but with its own personality. Instead of a full pie crust encasing the filling, this version keeps things simpler with just a top layer of dough. That means less work and fewer chances of a soggy base, which is something beginners often struggle with.
There’s also a stovetop version of the dish that skips the crust entirely and leans more into being a creamy chicken stew. Both are good, but the baked version has that golden, slightly crisp topping that adds contrast to the creamy filling underneath.
Building Flavor from the Start
A good chicken pastel begins with proper marination. When you soak the chicken in soy sauce, calamansi juice, salt, and pepper, you’re not just seasoning the surface. The acid from the calamansi helps tenderize the meat while the soy sauce brings depth and a subtle umami flavor.
I used to skip marinating when I was in a hurry, but the difference is noticeable. Without it, the chicken tastes flat even if the sauce is rich. Even a short marination of about 20 to 30 minutes already makes a big impact.
Sautéing for Depth
When you sauté garlic and onions before adding the chicken, you’re creating the base flavor of the dish. Let the onions soften until slightly translucent and the garlic turns fragrant but not browned. Burnt garlic can give a bitter taste that carries through the whole pastel.
Once the chicken hits the pan, resist the urge to stir right away. Let it sit for a minute or two so it can lightly brown. That slight sear adds another layer of flavor, something you won’t get if you keep moving it around too quickly.
Simmering the Chicken Pastel Filling
After adding the marinade, bay leaf, and chorizo de bilbao, the dish starts to take on its signature aroma. The chorizo releases oil and color, giving the sauce a slightly reddish tint and a deeper savory note.
When you add potatoes and carrots, cut them evenly so they cook at the same rate. I learned this the hard way when I had mushy carrots and still-firm potatoes in one batch. Let everything simmer gently. A rapid boil can toughen the chicken and break down the vegetables too quickly.
As the pastel filling cooks, you’ll notice the sauce becoming richer. This is a good time to taste and adjust the seasoning. Sometimes I add a pinch more pepper or a splash of soy sauce depending on how the flavors develop.
Adding Texture and Contrast
The addition of mushrooms, water chestnuts, Vienna sausage, and red bell peppers is what makes this dish interesting. Each ingredient brings a different texture. The mushrooms soak up the sauce, the chestnuts stay crisp, and the sausages add a slightly sweet, meaty bite.
In my experience, it’s best to add these later in the cooking process. If you put them in too early, the mushrooms can become overly soft and the bell peppers lose their color. You want them tender but still distinct in texture.
Why the White Sauce Matters
A key element of chicken pastel is the white sauce. Melting butter and incorporating it into the dish helps create that creamy consistency that ties everything together.
The fat from the butter coats the ingredients, making the filling feel richer without being overly heavy. If your sauce looks too thin, let it simmer a bit longer before transferring it to your baking dish. A slightly thickened sauce prevents the filling from becoming watery once baked.
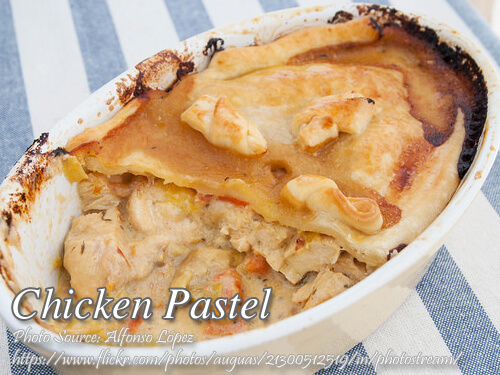
Assembling the Chicken Pastel
Once your filling is ready, transfer it into a baking dish. This is where you can get a little creative. Arrange sliced hard-boiled eggs on top. It might seem like a small detail, but it adds both flavor and visual appeal.
Cover everything with your dough, making sure it seals the edges. Brushing the top with egg yolk gives that beautiful golden finish once baked. Don’t skip making small slits on the crust. These allow steam to escape and prevent the crust from becoming soggy underneath.
Baking to Perfection
Bake your pastel in a preheated oven at 350 °F. After about 30 minutes, the crust should turn golden brown and slightly crisp.
One thing I always watch for is the bubbling around the edges. That’s a good sign the filling is hot and fully cooked through. If the top browns too quickly, you can loosely cover it with foil for the remaining baking time.
Let it rest for a few minutes before serving. Cutting into it right away can cause the filling to spill out too quickly. Giving it time helps everything settle.
A Dish with Spanish Roots
Like many Filipino dishes, chicken pastel has Spanish influences. The name itself comes from “pastel de pollo,” which refers to a savory meat pie. Over time, Filipino cooks adapted it to suit local tastes and available ingredients.
The addition of soy sauce, calamansi, and processed meats like Vienna sausage reflects how the dish evolved. It became a blend of colonial influence and everyday Filipino cooking, which is why it feels both familiar and a bit special.
Common Mistakes to Avoid
One of the most common issues with this chicken dish is overcooking the vegetables. Keep an eye on their texture during simmering. They should be tender but still hold their shape.
Another mistake is using too much liquid. The filling should be creamy, not soupy. If it looks too watery before baking, let it reduce a bit more on the stove.
Finally, don’t skip preheating the oven. Putting the dish into a cold oven can affect how the crust cooks, often resulting in a pale or uneven top.
Serving Chicken Pastel at Home
Serve your pastel warm, straight from the baking dish. It pairs well with steamed rice, especially if you like something to soak up the creamy sauce.
In our house, this dish usually shows up during birthdays or small celebrations. My cousin once joked that it’s the “level-up” version of chicken stew, and honestly, that’s a pretty accurate way to describe it.
It’s hearty, comforting, and just a little indulgent. Once you get the hang of it, you’ll find yourself making it not just for special occasions, but even on days when you simply want something a bit more satisfying than the usual.
How to Cook Chicken Pastel
Ingredients
- 1 whole medium size chicken cut into serving pieces
- 1 tsp. soy sauce
- 1 Tbsp. calamansi juice
- 1-1/2 tsp. salt
- 4 tsp. pepper
- 1 tsp. MSG
- 3 tbsp. cooking oil
- 1 Tbsp. garlic minced
- 2 Tbsp. onion chops
- 1 pc bay leaf laurel
- 1 cup Vienna sausage sliced
- 1 pc Chorizo de Bilbao sliced
- 1/2 cup potatoes cubed
- 1 cup water
- 4 cup water chestnuts
- 4 cup red pepper cut into strips
- 2 hard-boiled eggs sliced
Instructions
How to Cook Chicken Pastel:
- Marinate chicken in soy sauce, calamansi juice, salt, pepper and MSG.
- Saute garlic and onions in oil. Add chicken and cook until slightly brown.
- Add bay leaf, chorizo de bilbao, and marinade. Stir occasionally.
- Add potatoes, carrots, and water. Simmer until chicken is tender.
- Add mushroom, water chestnut, Vienna sausage and red pepper.
- Cook until vegetables are tender.
- Make white sauce with 2 tbsp butter into pyrex dish.
- Place sliced eggs attractively on top of meat mixture.
- Cover with crust and brush top with beaten egg yolk.
- Make slits on top to let out steam.
- Bake in preheated oven at 350 °F for 30 minutes or until crust is golden brown.
- Good for 6 persons.
Notes
Frequently Asked Questions:
Why is my chicken pastel too watery?
A watery filling usually means the sauce wasn’t reduced enough before baking. The mixture should be slightly thick on the stovetop since it will loosen more in the oven. Let it simmer a bit longer until it coats the back of a spoon for a creamier chicken pastel.How do I keep the crust from getting soggy?
A soggy crust often happens when steam gets trapped under the dough while baking. Make small slits on top to let the heat escape and keep the crust light and crisp. Also, avoid overly thin sauce so your pastel doesn’t release too much moisture.Can I make chicken pastel ahead of time?
Yes, you can prepare the filling in advance and store it in the fridge for up to a day. When ready to bake, transfer it to a dish, add the crust, and bake as instructed. This makes the dish a convenient option for gatherings or busy days.


So yummy !! Everybody liked it !!!
Hi Lorna, great! hope you visit this blog often!