
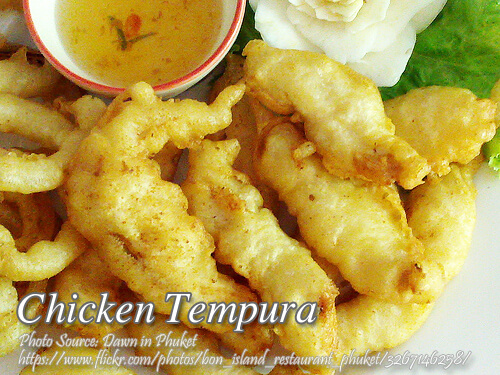
This chicken tempura is a variation of the well known shrimp tempura. Although this is nothing new, when you order mixed tempura in a fast food restaurant, there are also other stuffs aside from the shrimp like veggies or fish fillet that is also cooked the same way as the shrimp tempura. Compared to other meat like pork or beef, chicken is very suitable because it cooks easily and is tender when you fry it with batter.
Why You’ll Love This Chicken Tempura
There’s something especially satisfying about biting into a piece of chicken tempura while it’s still hot from the pan. The outside is light and crisp, while the chicken inside stays tender and juicy. It’s the kind of dish that looks like it might take a lot of work, but once you understand a few simple techniques, it’s actually quite manageable for a home cook.
This recipe is a variation of the more familiar shrimp tempura. If you’ve ordered mixed tempura at a Japanese restaurant or even at a fast-food restaurant, you’ve probably noticed that shrimp isn’t always the only thing in the basket. Vegetables, fish, and other ingredients can be coated in the same airy batter and fried until crisp.
Chicken works surprisingly well in this style of cooking. Unlike tougher cuts of beef or pork, chicken can become tender in just a short frying time, especially when sliced into thin, even strips.
Why Chicken Tempura Works So Well
The secret is really in the balance between the chicken and the batter. The meat needs to be thin enough to cook quickly, while the coating should be light enough that it doesn’t overwhelm the chicken.
I prefer using boneless, skinless chicken breast for this recipe because it’s easy to slice into uniform pieces. You can also use boneless chicken thigh if you want something a little richer and juicier. The important thing is consistency. If some pieces are thick and others are thin, the thinner ones may brown too quickly while the thicker pieces are still cooking.
When preparing the chicken, try to cut the strips roughly the same size. This small step makes a bigger difference than you might expect.
The Secret to a Light Tempura Batter
What makes this chicken tempura different from ordinary fried chicken is the batter. Instead of making a thick, heavy coating, this recipe uses beaten egg whites to help create a lighter texture.
Start by beating the egg white until stiff. This means that when you lift the whisk or beater, the egg white should hold its shape instead of immediately falling back into the bowl.
Why does this help? Whipped egg whites contain tiny air bubbles. When they’re folded into the batter and exposed to hot oil, those air pockets help produce a lighter, more delicate coating.
The egg yolk is mixed separately with cold water, flour, and baking powder. Keeping the components separate until the right stage also helps preserve some of that air from the whipped whites.
Be gentle when folding the egg whites into the flour mixture. You don’t want to stir aggressively and knock all the air out. A few small streaks of egg white are fine. The goal isn’t a perfectly smooth batter.
Why Cold Water Matters
Cold water is another little detail that’s easy to overlook. It helps keep the batter cold before it hits the hot oil, which contributes to the characteristic crisp texture associated with tempura.
This is one of those cooking techniques where temperature really matters. You’re creating a sharp contrast between a cold, airy coating and very hot oil. Once the battered chicken goes into the pan, the water in the batter rapidly turns to steam while the outer surface cooks and crisps.
That’s why I wouldn’t recommend preparing the batter with warm or room-temperature water if you’re aiming for a lighter crust.
The batter is also refrigerated for two hours in this recipe. This gives you a convenient make-ahead option and keeps the mixture nicely chilled before frying.
Getting the Oil Temperature Right
You don’t need a fancy deep fryer to make this dish. A deep frying pan or heavy pot works perfectly well as long as there’s enough oil for the chicken to cook without touching the bottom too much.
Heat the oil over medium heat. One of the most common mistakes when frying at home is letting the oil get excessively hot because we want the food to brown quickly. With battered chicken, this can leave you with a golden exterior and chicken that hasn’t cooked through.
On the other hand, oil that isn’t hot enough can make the coating greasy. Instead of setting quickly, the batter absorbs oil while it cooks.
If you have a kitchen thermometer, aim for roughly 350°F to 375°F (175°C to 190°C). If you don’t, fry one small piece first. The batter should begin sizzling immediately and gently bubbling around the chicken. It shouldn’t sit quietly in the oil.
Frying the Chicken Until Crisp
Dip each chicken strip into the chilled batter, making sure it’s coated but not excessively thick. Let any obvious excess drip back into the bowl before carefully lowering the piece into the hot oil.
Fry for about one minute on each side, or until golden brown.
The short cooking time is another reason the chicken needs to be sliced fairly thin. If your strips are unusually thick, they may need more time than the recipe indicates. Don’t rely on color alone. The chicken should be fully cooked inside, with no raw or translucent meat remaining.
Try not to overcrowd the pan. I know it’s tempting to fry everything at once, especially when everyone is waiting at the table, but adding too many pieces at the same time can drop the oil temperature. The result is usually a softer, greasier coating.
Give the chicken enough space to fry properly, even if that means working in batches.
Drain It Properly for a Crisp Coating
Once golden and cooked through, transfer the fried pieces to a colander or a plate lined with paper towels.
If you have a wire rack, that’s even better. A rack allows excess oil to drip away while keeping the bottom of the coating from sitting directly against a wet paper towel.
This is a small finishing step, but it helps preserve the crisp texture. Fried food naturally softens as steam escapes, so it’s best served soon after cooking.
A Simple Dipping Sauce Makes It Better
You can serve this dish with your favorite dipping sauce. A classic tempura-style dipping sauce is an especially good match because its savory flavor complements the mild chicken without overpowering the crisp coating.
This is also a good place to adjust according to your taste. Some people like a stronger, saltier dip, while others prefer something lighter. If you’re serving children, you can keep the sauce mild and let everyone add as much as they like.
For me, the dipping sauce is what turns a plate of fried chicken into something that feels much more like a complete tempura meal.
A Little History Behind Tempura
Tempura has become closely associated with Japanese cuisine, but its history has an interesting connection to foreign influence. The cooking method is generally believed to have been influenced by Portuguese missionaries and traders who arrived in Japan during the 16th century.
Over time, Japanese cooks adapted the technique into the delicate style we recognize today. Shrimp, fish, squid, and vegetables became popular choices, and tempura developed into an important part of Japanese food culture.
Chicken isn’t necessarily the first ingredient that comes to mind when we hear the word tempura, but there’s nothing strange about applying the same cooking method to other ingredients. It’s one reason mixed tempura can be so fun: the same light batter can transform very different ingredients.
My Tips for Better Chicken Tempura
The biggest lesson I’ve learned with this recipe is not to rush the frying process. Have your chicken sliced and your batter ready before the oil gets hot. Once you start frying, things move quickly.
Keep the batter cold, handle the whipped egg whites gently, and avoid overcrowding the pan. These details may sound minor, but together they make a noticeable difference in the final texture.
And don’t worry if your first few pieces aren’t perfectly shaped. Homemade tempura doesn’t have to look like restaurant food. As long as the chicken is cooked through and the coating is crisp and light, you’re already on the right track.
Serving Chicken Tempura at Home
Serve the fried chicken while it’s hot and crisp, with your favorite dipping sauce on the side. It makes an easy appetizer, but it can also be served with steamed rice and vegetables for a simple family meal.
What I like most about this recipe is that it takes a familiar ingredient and gives it a completely different texture. Chicken is inexpensive, easy to find, and familiar to almost everyone, but the airy coating makes it feel a little special.
If you’ve only made shrimp tempura before, this is a fun variation to try. And if you’re completely new to tempura, don’t let the whipped egg whites or chilled batter intimidate you. Once you see that first piece turn golden and crisp in the oil, the technique starts to make sense.
The best part is hearing that first crunch when you take a bite. That’s when you know you got it right.
How to Cook Chicken Tempura
Ingredients
- 1/2 kilo chicken breast cut into 1/2" x 1/2" strips.
- 1/4 tsp. ground black pepper
- 1/4 tsp. salt
- cooking oil for deep frying
For the Tempura Batter Ingredients:
- 1 pc raw egg separate the yolk from the egg white
- 1 cup ice cold water
- 1 cup flour
- 1/4 tsp. baking powder
Tempura Sauce Ingredients::
- 1/2 cup fish or shrimp broth
- 1/4 cup soy sauce
- 1/8 cup rice wine
- 1 tsp. sugar
- 2 cloves minced garlic
- 1/4 cup grated radish labanos
Instructions
How to Cook Chicken Tempura:
- In a bowl, beat the egg white until stiff and set aside. In a separate bowl, pour a cup of cold water and beat in egg yolk.
- Mix the flour on the beaten egg yolk and add baking powder. Fold in beaten egg whites then refrigerate the batter for 2 hours.
- In a deep frying pan, heat (medium heat) cooking oil just enough for deep frying.
- Dip each of the chicken strips in batter then fry for one minute on each side or until golden brown.
- Drain in an colander or paper towels. Serve with any dipping sauce you wish or you can also use the shrimp tempura sauce. To make the tempura sauce, just mix all the ingredients above.
Video
Notes
Keep the Batter Cold
Use cold water and refrigerate the batter before frying to help create a lighter, crispier coating. The temperature difference between the chilled batter and hot oil helps the coating set quickly without becoming too greasy. Avoid leaving the batter at room temperature for too long while you’re frying.Don’t Overcrowd the Pan
Fry the chicken in small batches so the oil temperature stays steady. Adding too many pieces at once can cool the oil and leave the coating soft and greasy instead of crisp. Give each strip enough space to cook evenly and turn golden brown.Slice the Chicken Evenly
Cut the chicken into thin, similar-sized strips so they cook at roughly the same rate. Thick pieces may take longer to cook through, while very thin pieces can become dry before the coating turns golden. If you’re using chicken breast, slice across the grain for more tender bites.


Thanks for the chicken tempura recipe and the sauce!
Hi Ella, you are very welcome!